Howdy WordPress users! Everyone wants to use latest WordPress version on his/her blog. But sometimes, we had issues after upgrading to new WP version. And you want to revert on the old version. In this article, I will tell you “how to downgrade WordPress without losing content and disturing site performance as well as rankings.”
Before go through the method, I want to share some example of issues faced after upgrading:
- Site broken
- Links not works
- Meta Data Missing
- PHP error
- Fatal Error
- Parsing errors
- Library file missing errors
- and much more
Once you successfully figured out that your WP upgradation affecting your blog performance then you need to follow this guide. I strongly recommend not to downgrade WP version because old versions always has some flaws and issues. Better to moderate your site according to new release.
Downgrade WordPress without losing Content and Rankings
Before taking any step, be sure that you have save backup of your blog. Because due to hositng limitations and dedicated installations, sometimes downgrading and upgrading cause fatal error issues. And WordPress forces itself to save backup before updating anything. You may also like to read How to Set up WordPress Website in 5 Minutes.
1. Take Database Backup:
First you need to take database backup. It is not ony important when you are downgrading, It is also important while you are upgrading. Becasue when you upgrade or downgrade WordPress versions the database tables overwrite again and again. If you got any issue after version changings, you will lost all settings as well as important data. So, it is very important to take backup of your blog’s database. You can easily take backup of your database through your hosting Cpanel. You can also use WordPress plugins for this purpose.
2. Take Files Backup:
Although it is not enough important but try to do this too. Files backup help you in restoring mising and deleted files as well as redure data losing mishaps. You can download all files from your hosting panel.
3. Download Old WordPress Version:
Now you need to download all files of the old version which you want to install on your blog. You can find all WP versions here -> WordPress Releases. Download the required version unpack it and delete “WP-Content” folder. WP-Content folder contains all of your site contents and plugins. If you override this file to your server then you will loss all content (posts, images, plugins, etc).
4. Deactivate All Plugins:
Due to safety reasons, I strongly recommend to deactivate all plugins.5. Delete or Move WP-Admin and WP-Includes folder:
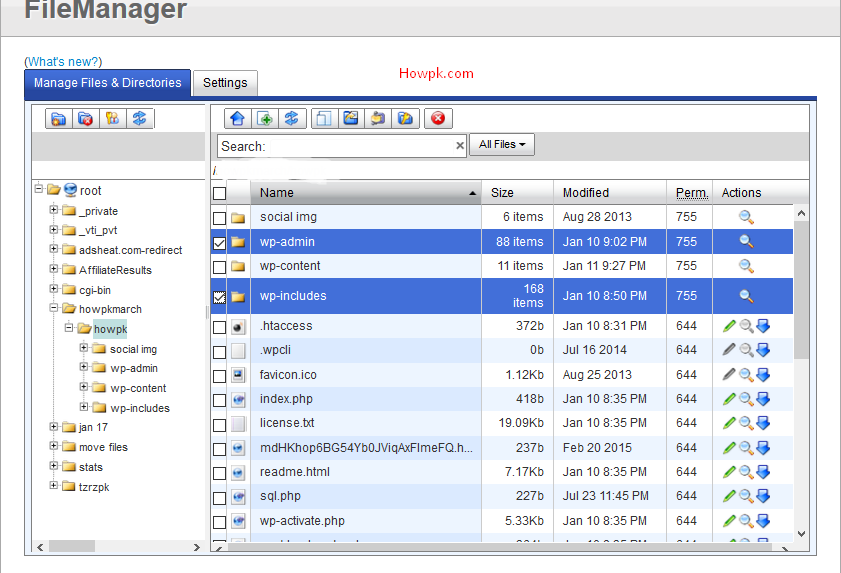
Now you need to login into your hosting Cpanel and look for your blog root folder to access wp-admin and wp-includes folders. You can also reach there through FTP client. I use FileZilla application for this purpose. Now you need to delete or move Wp-admin and Wp-includes folders. I recomment not to delete them, Create a new folder on your server/root directory and move both folders there. In case of any problem, you can easily revert the changes.
Note: Keep in mind in the whole process you are not going to touch Wp-Content folder.
6. Upload Downloaded WordPress Version:
Now, Simply upload the required WP version. You can use any FTP client or hosting fie manger for this purpose. Overide the other files. Keep in mind, you need to upload all files instead of “wp-content” folder.
7. Update Your WP Database:
After succesfully uplaod all files, just go to your WordPress Login URL. You will be prompted to update your WordPress database. Click on “Update WordPress Database” and then click continue to login.Once you’re logged in, you should see that you’re running whatever version of WordPress that you downgraded to. Congrats!
I hope you enjoyed my article. Feel free to share it with other your blogger friends. If you have any question feel free to ask me. I would love to help you. Personally, I don’t recommend using older versions of WordPress when newer ones are available. Old versions are full with flaws and bugs, which can hurt your blog performane.


![Deactivate all plugins [howpk.com]](https://howpk.com/wp-content/uploads/2017/01/deactivate-all-plugins-howpk.com_-1024x417.png)

![Downgrade WordPress without losing Data and Rank [howpk.com]](https://howpk.com/wp-content/uploads/2017/01/Downgrade-WordPress-without-losing-Data-and-Rank-howpk.com_.png)
